本文是Transfomrer的Pytorch版本实现. 实现的过程中非常考验维度控制 的功底. 本文实现参考Transformer 的 PyTorch 实现 , 我对其在个别地方进行了修改, 并对所有的数据全部 加上了维度注释.
本文的代码已经放到了Colab上, 打开设置GPU就可以复现(需要科学上网).
右键我在COLAB中打开!
右键我在COLAB中打开!
如果你不能科学上网, 应该看不到Open in Colab的图标.
在开头需要说明的是:
网上的所有流传的代码, 一般都会把batch_size放在第0维. 因为我们基本上不对batch维做操作, 放在最前面来防止影响后面总需要使用transpose移动.
如果对Transformer不熟悉, 最好熟悉后再来看这篇文章.
注意view和transpose拆维度时不要乱了.
Preparing
按照惯例, 先导包:
1
2
3
4
5
import torch from torch import nnfrom torch import optimfrom torch.utils import data as Dataimport numpy as np
因为后面需要用到一些关于Transformer的超参数, 所以在开头就先全部定义出来:
1
2
3
4
5
6
7
d_model = 512 1024 2048 64 6 8 0.1
如果你对Transformer足够熟悉, 看变量名和注释一定能看出来它们的含义, 它们依次是:
d_model: Embedding的大小.
max_len: 输入序列的最长大小.
d_ff: 前馈神经网络的隐藏层大小, 一般是d_model的四倍.
d_k, d_v: 自注意力中K和V的维度, Q的维度直接用K的维度代替, 因为这二者必须始终相等.
n_layers: Encoder和Decoder的层数.
n_heads: 自注意力多头的头数.
p_drop: Dropout的概率.
Mask
Mask分为两种, 一种是因为在数据中使用了padding, 不希望pad被加入到注意力中进行计算的Pad Mask for Attention, 还有一种是保证Decoder自回归信息不泄露的Subsequent Mask for Decoder.
Pad Mask for Attention
为了方便, 假设<PAD>在字典中的Index是0, 遇到输入为0直接将其标为True.
1
2
3
4
5
6
7
8
9
10
11
12
13
14
15
16
17
18
def get_attn_pad_mask (seq_q, seq_k ):''' Padding, because of unequal in source_len and target_len. parameters: seq_q: [batch, seq_len] seq_k: [batch, seq_len] return: mask: [batch, len_q, len_k] ''' 0 ).unsqueeze(1 ) return pad_attn_mask.expand(batch, len_q, len_k)
在Encoder和Decoder中使用Mask的情况可能各有不同:
在Encoder中使用Mask, 是为了将encoder_input中没有内容而打上PAD的部分进行Mask, 方便矩阵运算.
在Decoder中使用Mask, 可能是在Decoder的自注意力对decoder_input 的PAD进行Mask, 也有可能是对Encoder - Decoder自注意力时对encoder_input和decoder_input的PAD进行Mask.
Subsequent Mask for Decoder
该Mask是为了防止Decoder的自回归信息泄露而生的Mask, 直接生成一个上三角矩阵即可:
1
2
3
4
5
6
7
8
9
10
11
12
13
14
15
def get_attn_subsequent_mask (seq ):''' Build attention mask matrix for decoder when it autoregressing. parameters: seq: [batch, target_len] return: subsequent_mask: [batch, target_len, target_len] ''' 0 ), seq.size(1 ), seq.size(1 )] 1 ) return subsequent_mask
其中, 用到了生成上三角的函数np.triu, 其用法为:
python
1 2 3 4 5 6 7 8 9 10 11 12 13 14 15 16 17 18 np.triu(np.ones([3 , 4 ]), k=1 )''' array([[0., 1., 1., 1.], [0., 0., 1., 1.], [0., 0., 0., 1.]]) ''' 3 , 4 ]), k=0 )''' array([[1., 1., 1., 1.], [0., 1., 1., 1.], [0., 0., 1., 1.]]) ''' 3 , 4 ]), k=-1 )''' array([[1., 1., 1., 1.], [1., 1., 1., 1.], [0., 1., 1., 1.]]) '''
其中k能控制上三角的大小, 越大则上三角范围越小. 与之完全相反 的函数是np.tril, 能够生成下三角矩阵.
Positional Encoding
在Transformer中, 使用的是绝对位置编码, 用于传输给模型Self - Attention所不能传输的位置信息, 编码使用正余弦公式实现: 𝑃𝐸(𝑝𝑜𝑠,2𝑖)=sin(𝑝𝑜𝑠/100002𝑖𝑑𝑚𝑜𝑑𝑒𝑙)𝑃𝐸(𝑝𝑜𝑠,2𝑖+1)=cos(𝑝𝑜𝑠/100002𝑖𝑑𝑚𝑜𝑑𝑒𝑙) 基于上述公式, 我们把它实现出来:
1
2
3
4
5
6
7
8
9
10
11
12
13
14
15
16
17
18
19
20
21
22
23
24
25
26
27
class PositionalEncoding (nn.Module):def __init__ (self, d_model, dropout=.1 , max_len=1024 ):super (PositionalEncoding, self).__init__()0 , max_len).float ().unsqueeze(1 ) 0 , d_model, 2 ).float () * 10000 ])) / d_model)) 0 ::2 ] = torch.sin(position * div_term) 1 ::2 ] = torch.cos(position * div_term) 0 ).transpose(0 , 1 )'pe' , positional_encoding)def forward (self, x ):0 ), ...]return self.dropout(x)
实现1/100002𝑖𝑑𝑚𝑜𝑑𝑒𝑙 时既可以像我写出的那样使用幂指运算, 也可以直接写出.
register_buffer能够申请一个缓冲区中的常量 , 并且它不会被加入到计算图中, 也就不会参与反向传播.
更多关于register在parameter和buffer上的区别请见Pytorch模型中的parameter与buffer .
Feed Forward Neural Network
在Transformer中, Encoder或者Decoder每个Block都需要用一个前馈神经网络来添加非线性 : FFN(𝑥)=ReLU(𝑥𝑊1+𝑏1)𝑊2+𝑏2 注意, 这里它们都是有偏置的, 而且这两个Linear可以用两个1×1 的卷积来实现:
1
2
3
4
5
6
7
8
9
10
11
12
13
14
15
16
17
18
19
20
21
22
23
24
25
class FeedForwardNetwork (nn.Module):''' Using nn.Conv1d replace nn.Linear to implements FFN. ''' def __init__ (self ):super (FeedForwardNetwork, self).__init__()1 )1 )def forward (self, x ):1 , 2 ) 1 , 2 ) return self.layer_norm(residual + x)
作为一个子层, 不要忘记Transformer中提到的Residual Connection和Layer Norm.
我选择用两个卷积代替Linear. 在nn.Conv1d中, 要求数据的规格为[batch, x, ...], 我们是要对d_model 上的数据进行卷积, 所以还是需要transpose一下.
Multi - Head Attention
先说多头注意力, 因为多头注意力能够决定缩放点积注意力的输入大小. 作为一个子层, 其中的Residual Connection和Layer Norm是必须的.
多头注意力是多个不同的头来获取不同的特征, 类似于多个卷积核 所达到的效果. 在计算完后通过一个Linear调整大小: MultiHead(𝑄,𝐾,𝑉)=Concat(head1,head2,…,headℎ)𝑊𝑂where head𝑖=Attention(𝑄𝑊𝑖𝑄,𝐾𝑊𝑖𝐾,𝑉𝑊𝑖𝑉) 多头注意力在Encoder和Decoder中的使用略有区别, 主要区别在于Mask的不同. 我们前面已经实现了两种Mask函数, 在这里会用到.
多头注意力实际上不是通过弄出很多大小相同的矩阵然后相乘来实现的, 只需要合并到一个矩阵进行计算:
1
2
3
4
5
6
7
8
9
10
11
12
13
14
15
16
17
18
19
20
21
22
23
24
25
26
27
28
29
30
31
32
33
34
35
36
37
38
39
40
41
42
43
class MultiHeadAttention (nn.Module):def __init__ (self, n_heads=8 ):super (MultiHeadAttention, self).__init__()False )False )False )False )def forward (self, input_Q, input_K, input_V, attn_mask ):''' To make sure multihead attention can be used both in encoder and decoder, we use Q, K, V respectively. input_Q: [batch, len_q, d_model] input_K: [batch, len_k, d_model] input_V: [batch, len_v, d_model] ''' 0 )1 , n_heads, d_k).transpose(1 , 2 ) 1 , n_heads, d_k).transpose(1 , 2 ) 1 , n_heads, d_v).transpose(1 , 2 ) 1 ).repeat(1 , n_heads, 1 , 1 ) 1 , 2 ).contiguous() 1 , n_heads * d_v).contiguous() return self.layer_norm(residual + output), attn
提两个非常重要的点:
在拆维度时不要破坏维度原来本身的意义.
虽然新版本已经有reshape函数可以用了, 但是仍然不要忘记, transpose后如果接permute或者view必须要加contiguous, 这是数据真实存储连续与否 的问题, 请参见Pytorch之张量基础操作 中的维度变换 部分.
Scaled DotProduct Attention
Tranformer中非常重要的概念, 缩放点积注意力, 公式如下: Attention(𝑄,𝐾,𝑉)=softmax(𝑄𝐾𝑇𝑑𝑘)𝑉 实现起来非常简单, 只需要把Q, K两个矩阵一乘, 然后再缩放, 过一次Softmax, 再和V乘下:
python
1
2
3
4
5
6
7
8
9
10
11
12
13
14
15
16
17
class ScaledDotProductAttention (nn.Module):def __init__ (self ):super (ScaledDotProductAttention, self).__init__()def forward (self, Q, K, V, attn_mask ):''' Q: [batch, n_heads, len_q, d_k] K: [batch, n_heads, len_k, d_k] V: [batch, n_heads, len_v, d_v] attn_mask: [batch, n_heads, seq_len, seq_len] ''' 1 , -2 )) / np.sqrt(d_k) 1e9 )1 )(scores) return prob, attn
masked_fill_能把传进来的Mask为True的地方全都填充上某个值, 这里需要用一个很大的负数来保证𝑒𝑥→0, 使得其在Softmax 中可以被忽略.
Encoder and Decoder
Encoder
先写出Encoder的每个Layer, 由多头注意力和FFN组成:
1
2
3
4
5
6
7
8
9
10
11
12
13
14
15
16
17
18
19
class EncoderLayer (nn.Module):def __init__ (self ):super (EncoderLayer, self).__init__()def forward (self, encoder_input, encoder_pad_mask ):''' encoder_input: [batch, source_len, d_model] encoder_pad_mask: [batch, n_heads, source_len, source_len] encoder_output: [batch, source_len, d_model] attn: [batch, n_heads, source_len, source_len] ''' return encoder_output, attn
对于给定的encoder_input和encoder_pad_pask, Encoder应该能够完成整个Block(Layer)的计算流程. 然后实现整个Encoder:
1
2
3
4
5
6
7
8
9
10
11
12
13
14
15
16
17
18
19
20
21
22
class Encoder (nn.Module):def __init__ (self ):super (Encoder, self).__init__()for layer in range (n_layers)])def forward (self, encoder_input ):0 , 1 )).transpose(0 , 1 ) list ()for layer in self.layers:return encoder_output, encoder_self_attns
对于整个Encoder, 直接将Token的Index传入Embedding中, 再添入位置编码, 之后就经过多层Transformer Encoder. 在传入Block前, 先需要计算Padding的Mask, 再将上层的输出作为下层输入依次迭代.
Decoder
其实实现了Encoder, Decoder的实现部分都是对应的. 先实现Decoder的Block:
1
2
3
4
5
6
7
8
9
10
11
12
13
14
15
16
17
18
19
20
21
22
23
24
25
26
27
28
class DecoderLayer (nn.Module):def __init__ (self ):super (DecoderLayer, self).__init__()def forward (self, decoder_input, encoder_output, decoder_self_mask, decoder_encoder_mask ):''' decoder_input: [batch, target_len, d_mdoel] encoder_output: [batch, source_len, d_model] decoder_self_mask: [batch, target_len, target_len] decoder_encoder_mask: [batch, target_len, source_len] ''' return decoder_output, decoder_self_attn, decoder_encoder_attn
与Encoder相对应, 只不过因为多了一个Encoder - Decoder自注意力, 所以需要额外计算一个Encoder - Decoder的Mask. 然后写出整个Decoder:
1
2
3
4
5
6
7
8
9
10
11
12
13
14
15
16
17
18
19
20
21
22
23
24
25
26
27
28
29
30
31
32
33
class Decoder (nn.Module):def __init__ (self ):super (Decoder, self).__init__()for layer in range (n_layers)])def forward (self, decoder_input, encoder_input, encoder_output ):''' decoder_input: [batch, target_len] encoder_input: [batch, source_len] encoder_output: [batch, source_len, d_model] ''' 0 , 1 )).transpose(0 , 1 ) 0 )for layer in self.layers:return decoder_output, decoder_self_attns, decoder_encoder_attns
和Encoder相对应, 但Decoder和Encoder使用了两个不同的Embedding. 对于Mask, 可以把自回归Mask和Padding Mask用torch.gt整合成一个Mask, 送入其中.
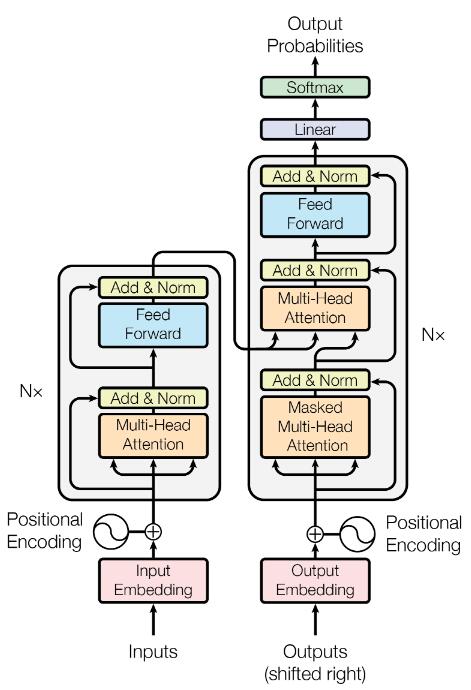
终于到了这一步, 虽然后面还有一些小小的工作, 但现在终于能看到Transformer的全貌 了:
img
里面有一个Encoder, 一个Decoder, 在Decoder端还需要加上投影层来分类:
1
2
3
4
5
6
7
8
9
10
11
12
13
14
15
16
17
18
19
20
21
22
23
24
25
class Transformer (nn.Module):def __init__ (self ):super (Transformer, self).__init__()False )def forward (self, encoder_input, decoder_input ):''' encoder_input: [batch, source_len] decoder_input: [batch, target_len] ''' return decoder_logits.view(-1 , decoder_logits.size(-1 )), encoder_attns, decoder_self_attns, decoder_encoder_attns
最后对logits的处理是view成了[batch * target_len, target_vocab_size], 前面的大小并不影响我们一会用交叉熵计算损失.
输入数据没什么好说的, 为了方便直接采用了硬编码的方式构造word2index, 这样我们的输入序列都被转换为了Token的index输入到Embedding层中, 自动转化为嵌入在低维空间的稠密向量:
Decoder的输入构造过程采用了Teaching Forcing , 保证了训练过程是可以保持并行 的.
1
2
3
4
5
6
7
8
9
10
11
12
13
14
15
16
17
18
19
20
21
22
23
24
25
26
27
sentences = ['ich mochte ein bier P' , 'S i want a beer .' , 'i want a beer . E' ],'ich mochte ein cola P' , 'S i want a coke .' , 'i want a coke . E' ]'P' : 0 , 'ich' : 1 , 'mochte' : 2 , 'ein' : 3 , 'bier' : 4 , 'cola' : 5 }len (source_vocab)'P' : 0 , 'i' : 1 , 'want' : 2 , 'a' : 3 , 'beer' : 4 , 'coke' : 5 , 'S' : 6 , 'E' : 7 , '.' : 8 }for i, w in enumerate (target_vocab)}len (target_vocab)5 6 def make_data (sentences ):for i in range (len (sentences)):for word in sentences[i][0 ].split()]for word in sentences[i][1 ].split()]for word in sentences[i][2 ].split()]return torch.LongTensor(encoder_inputs), torch.LongTensor(decoder_inputs), torch.LongTensor(decoder_outputs)
数据量非常的少, 所以等会的训练会根本不充分.
DataSet
制作一个Seq2Seq的数据集, 只需要按照Index返回Encoder的输出, Decoder的输入, Decoder的输出(label)就好:
1
2
3
4
5
6
7
8
9
10
11
12
13
class Seq2SeqDataset (Data.Dataset):def __init__ (self, encoder_input, decoder_input, decoder_output ):super (Seq2SeqDataset, self).__init__()def __len__ (self ):return self.encoder_input.shape[0 ]def __getitem__ (self, idx ):return self.encoder_input[idx], self.decoder_input[idx], self.decoder_output[idx]
Training
对训练所需的所有东西进行定义:
1
2
3
4
5
6
7
8
9
10
11
batch_size = 64 64 1e-3 'cuda' if torch.cuda.is_available() else 'cpu' )0 )2 , True )
这里有个criterion = nn.CrossEntropyLoss(ignore_index=0), 其中ignore_index=0指的是PAD在计算交叉熵时不应该被包括进去(前面提到过PAD所对应的Index是0).
我们从定义好的数据集中取出数据到device, 然后用torch三件套:
1
2
3
4
5
6
7
8
9
10
11
12
13
14
15
16
17
18
19
for epoch in range (epochs):''' encoder_input: [batch, source_len] decoder_input: [batch, target_len] decoder_ouput: [batch, target_len] ''' for encoder_input, decoder_input, decoder_output in data_loader:1 ))print ('Epoch:' , '%04d' % (epoch + 1 ), 'loss =' , '{:.6f}' .format (loss))
Attention Visualization
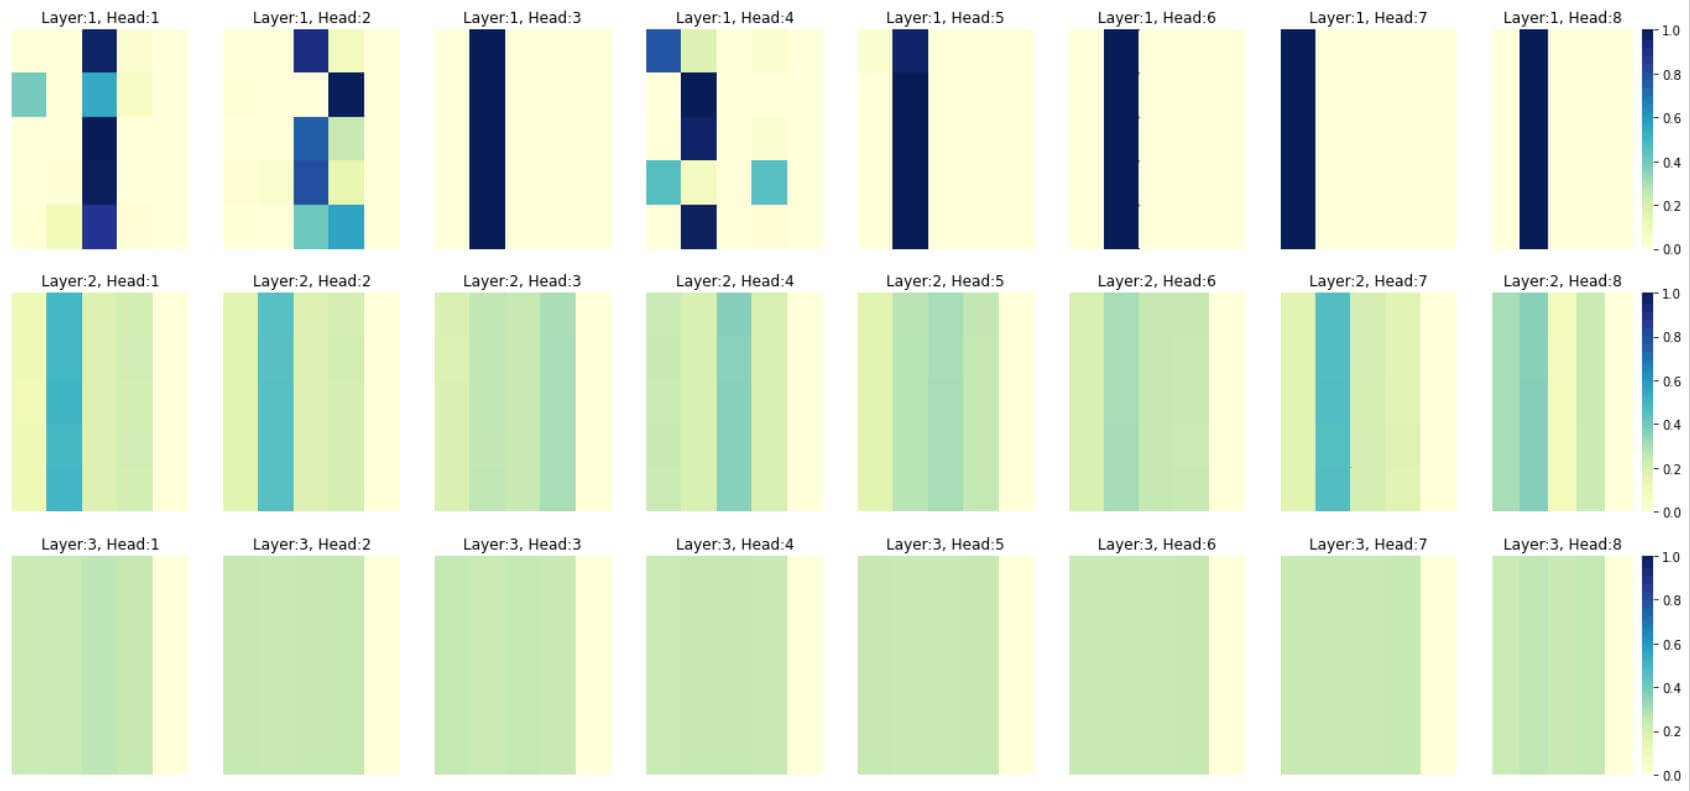
这回有了自己造的Transformer, 经过了根本不完全的训练: ) , 我们可以把它的Attention矩阵画出来看看:
1
2
3
4
5
6
7
8
9
10
11
12
13
14
15
16
17
18
19
20
21
22
23
24
25
26
27
import seaborn as snsimport matplotlib.pyplot as plt''' batch 1: [[1, 2, 3, 5, 0], [1, 2, 3, 4, 0]] ''' 0 4 3 , n_layers * 3 + 3 ))0 0 ].split()for layer in range (n_layers):for head in range (n_heads):1 'Layer:{}, Head:{}' .format (layer+1 , head+1 ))if i % n_heads == 0 :True else :False 'YlGnBu' , 0 , vmax=1 );
最后两行plt.xticks和plt.yticks纯粹是为了方便注释掉 , 才又写在了外面.
不要对结果太在意 , 因为训练是根本不完整的 , 数据也才只有两条. 我只是想画出来看看每个头都大致学到了什么:
img
最右侧是Padding, 这一列的权重都被当做是0来计算. 在浅一些的层确实学到了不同Token对不同部分的权重. 再深一些的层基本都没有得到训练, 因为数据实在太少了.


